Techniques in Building Risers
There are lots of ways you can add movement to a riser. You can stretch the sound using warp modes to add a cascading sound to it. Or you can use transposition to make the sample fall or rise in pitch. Bellow is my top 5 techniques I like to use.
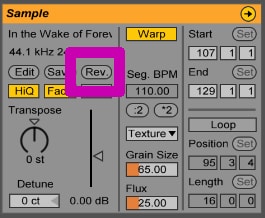
1. Reverse it
Like Missy Elliot said, Work it, Flip it and Reverse it. Reversing your sample is one of the easiest, most used, and yet still the most powerful way to start making a riser. A fairly common technique is to take a crash, or some long decay sound and reverse it. You can easily do this in Live by using the Sample Display Box. Just hit the Rev. button and it will flip the sample.
Once you do that, you have a simple riser to start. You can then continue to morph the sound and add effects or other techniques to add interest.
2. Warp it Good
The warp modes give you a lot of possibilities in shaping your sound. I personally love to use the Texture mode to modulate the sound. The first thing you need to do is stretch out the sample. I usually just use the Double Original Tempo button (*2) found below the Seg. BPM.
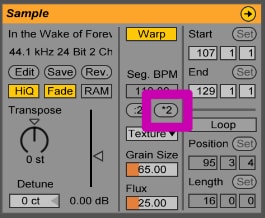
After you do that, then you can use the different warp modes. By stretching it out the effect you are doing is more obvious. I like to set it to Texture Mode. Then, like I explain in the video above, I record myself changing the Grain Size. It gives it a morphing and evolving sound.
3. Adding Effects
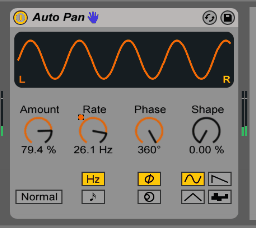
Even by taking a reversed crash and adding effects, you can create a distinct riser sound. There are tons of ways you can go about this, but the simplest way I know is using the Auto Panner. Just throw the auto panner on the track and automate the Rate Amount. This will change the tremolo / flutter effect to move over time. I also like to set the Phase to 360. This means it is changing the volume on the Left and Right to the same amount. It basically makes it a mono effect instead of changing the stereo field.
You can also use other effects such as the Auto Filter or the EQ 8. By automating a filter cut off you can also open the sound over time giving it movement.
4. Transposition
Another simple yet powerful tool is using the Transposition in the Envelope Box. This will raise or lower the pitch of the sample over time. To do this Navigate to the Envelope Box. There set the Device Chooser to Clip and the Control Chooser to Transposition. You can then make points and move them on your Sample Display. The image below shows the settings in the Envelope Box and then changing the sample transposition.

Another advance way of doing this is taking the same sample and duplicating it. You can have one sample raise as the other sample lowers in Transposition. This will lead to some really cool sweeps and falls.
5. Layers within Layers
The final technique I like to use when making risers is adding a bunch of layers. Having a sweeping white noise or a reverse crash is cool, but adding some water sounds or car crashes adds a whole new level. To do this just make a new Track and add new samples. You can experiment by having a wind sample transpose down while your crash sound transposes up. Then add the Autopanner to all the samples to get an even crazier morphing sample.
Combining these techniques will give you a massive control over your Risers. You will be able to easily morph your samples, add strange falling frequencies, and create a unique sonic pallet.
Want to save time in making risers? Kick-start your riser collection with some synthesized madness. I’ve been sound designing for my own music, video games, and effect libraries for years. I’ve collected the best other worldly sounds in a new Sample Pack called Ultimate Risers and Drops.


